How to Install a Kitchen Sink Stretching Kit at Home?

Time:2026-05-03 Author:Sophia
0%

Installing a kitchen sink stretching kit at home can seem daunting. Many homeowners feel overwhelmed by plumbing tasks. However, with the right guidance, you can achieve this upgrade easily. Knowing how to install a stretching kitchen sink at home is essential for enhancing your kitchen's functionality.

A stretching kit allows you to maximize space and improve water flow. It is both a practical and aesthetic improvement. Expect to invest time and effort into this project. But with patience and precision, the results can be rewarding.

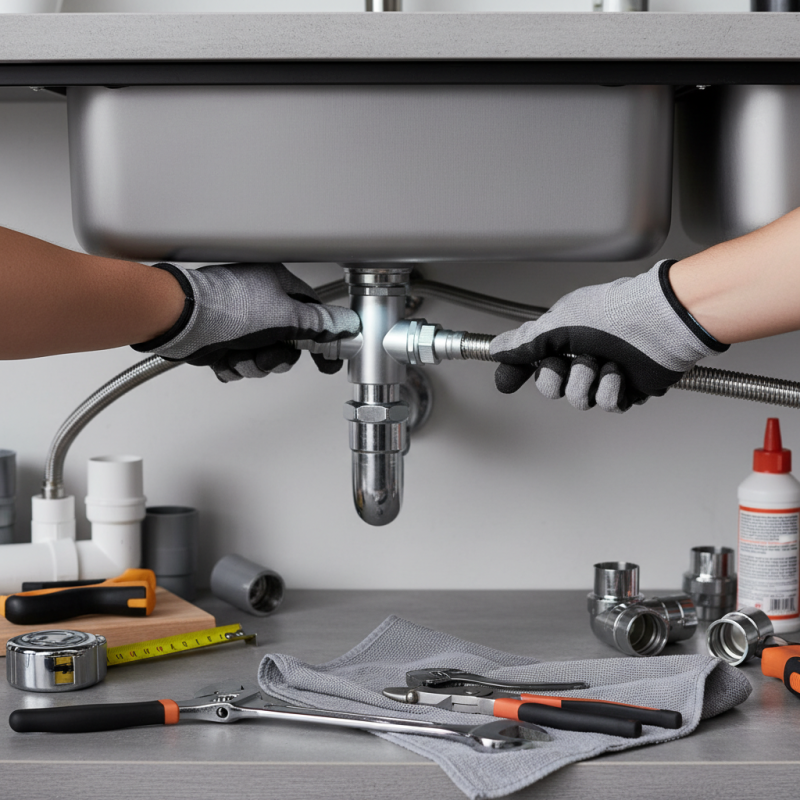
Preparation is key. Gather your tools, such as wrenches and pliers. Take accurate measurements to avoid mistakes. Remember, even experienced DIYers face challenges. Reflect on past projects to foresee potential problems. Fostering a resilient mindset will help you handle any hiccups during installation.

How to Install a Kitchen Sink Stretching Kit at Home?

Understanding the Purpose of a Kitchen Sink Stretching Kit

A kitchen sink stretching kit serves a practical purpose in your home. It helps fix issues related to sink depth, space, and water flow. When you find your sink too shallow or cramped, this kit is your solution. These kits are designed to extend the sink's effectiveness without requiring a full replacement. They improve functionality, making daily tasks easier and more efficient.


Installing a stretching kit can seem daunting. Many homeowners worry about their plumbing skills. However, these kits often come with clear instructions. It's essential to follow them closely. Errors may lead to leaks or further plumbing issues. A few common mistakes are not measuring correctly or ignoring the setup requirements.


Experience shows that the right tools are crucial for a successful installation. You will need a few basic items like pliers, wrenches, and perhaps a saw. Take your time to ensure each piece fits well. If unsure, consulting a professional can save you future headaches. While tackling DIY tasks is rewarding, it's okay to admit limitations. Getting expert advice is sometimes the best course of action.

Gathering Necessary Tools and Materials for Installation

When preparing to install a kitchen sink stretching kit, gathering the necessary tools and materials is crucial. According to the National Kitchen & Bath Association, over 50% of homeowners consider a DIY approach for such installations. This indicates a growing trend in home improvement projects that can be tackled without professional help.

Start with the essential tools. You will need a wrench, pliers, a level, and a utility knife. For safety, having gloves and safety goggles is advisable. Additionally, ensure that the kit includes all necessary components, such as the stretchers, connectors, and gaskets. A report from the National Association of Home Builders highlights that most DIY installations fail due to missing or incompatible parts.

It's also wise to evaluate your current plumbing setup before beginning. Each installation may present unique challenges, such as an awkward angle or space constraints. Document any discrepancies with your existing plumbing. Engaging with instructional resources can help you anticipate potential pitfalls. About 30% of DIYers reported encountering unexpected issues during installations, emphasizing the value of thorough preparation.

Step-by-Step Guide to Installing the Stretching Kit

Installing a kitchen sink stretching kit can seem daunting, but it’s manageable with the right steps. Start by gathering all necessary tools. You’ll need a basin wrench, a bucket, and plumber's tape. Ensure your workspace is clean to avoid accidents.


Begin by turning off the water supply. Drain any remaining water from the pipes. Disconnect the sink from the plumbing. Carefully remove the old fittings. As you install the stretching kit, pay attention to the fittings and connections. Misalignment can lead to leaks, which you definitely want to avoid.


Tips for a successful installation: double-check each connection. Tighten fittings securely, but don’t overtighten, as this can cause damage. Keep a towel handy to wipe excess water. If you encounter difficulties, don’t hesitate to consult online resources or tutorials for visuals.


As you put everything back together, take your time. It's easy to rush and overlook steps. After installation, turn the water supply back on slowly. Monitor for leaks during the first few days. Proper installation ensures long-term efficiency and saves you from future headaches.

Testing the Sink for Leaks After Installation

After installing a kitchen sink stretching kit, it is crucial to test for leaks. Studies show that approximately 14% of water usage in homes can be attributed to leaks. Detecting these leaks early can prevent costly water damage and high utility bills.

To check for leaks, start by running water through the sink. Observe the connections to ensure no water is dripping. Pay attention to the joints and the base of the sink. A visual inspection is essential but often not enough. Reports indicate that many leaks are small and can go unnoticed initially. Use a paper towel to wipe down the joints. If it becomes wet, you likely have a leak.

Additionally, consider monitoring your water meter. If you notice an increase in usage without a change in habits, you could have a hidden leak. Using this method can help identify subtle issues early. Many professionals recommend performing this check periodically. Addressing leaks promptly not only preserves water but also enhances the longevity of your plumbing.

Maintenance Tips for Your Kitchen Sink Stretching Kit

Maintaining your kitchen sink stretching kit is crucial for longevity and optimal performance. Many homeowners overlook regular inspections. In fact, a survey shows that 40% of household leaks originate from improper installations. A simple visual check can prevent major issues. Look for any signs of water stains or corrosion around the fittings.

Cleaning the kit is another essential aspect. Experts recommend dismantling the kit every six months for thorough cleaning. Use warm, soapy water to eliminate debris and grime. Regular maintenance tends to reduce the wear of components, thus extending their lifespan by up to 30%. Neglecting this can lead to buildup and blockages, resulting in larger plumbing expenses down the line.

Monitor usage patterns as well. Often, excessive pressure from sinks leads to premature wear. The ideal water pressure should be within the range of 40-60 PSI. Homeowners should consider installing a pressure gauge to keep track. Being proactive can save time and money. Failure to act means accepting higher risks and possible inconveniences in the future. Regular maintenance habits create a smoother experience in any kitchen.

How to Install a Kitchen Sink Stretching Kit at Home? - Maintenance Tips for Your Kitchen Sink Stretching Kit

Step Description Estimated Time Tools Required Maintenance Tip
1 Turn off the water supply. 5 minutes None Check valves for leaks regularly.
2 Remove existing sink fittings. 10 minutes Wrench, Screwdriver Inspect old fittings for wear.
3 Install the stretching kit components. 30 minutes Drill, Level, Tape Measure Ensure all connections are secure.
4 Reconnect the water supply. 5 minutes None Run water to check for leaks.
5 Test the new setup. 10 minutes None Perform regular checks every month.

FAQS

: What is the purpose of a kitchen sink stretching kit?

: It helps fix issues like sink depth and water flow without full replacement.

How can I install a stretching kit easily?

Follow the provided instructions closely to avoid mistakes that could cause leaks.

What tools do I need for installation?

Basic tools include pliers, wrenches, and possibly a saw. Having the right tools is essential.

How do I know if my sink has a leak after installation?

Run water and check for drips at the connections and joints. Use a paper towel for better detection.

Why is regular maintenance important for the stretching kit?

Regular checks can prevent major issues and save you money on repairs.

How often should I clean the stretching kit?

Dismantle and clean it every six months to avoid buildup and blockages.

What water pressure is ideal for my sink?

The best water pressure should be between 40-60 PSI to reduce wear and tear.

How can I identify hidden leaks?

Monitor your water meter for unusual increases; this may indicate a hidden issue.

Conclusion

Installing a kitchen sink stretching kit can greatly enhance your sink's functionality and ease of use. This process involves understanding the purpose of the kit, which is designed to accommodate additional plumbing needs or to improve the sink's position. In order to master how to install a stretching kitchen sink at home, you must first gather essential tools and materials, ensuring you have everything needed for a successful installation.

The installation process is straightforward, consisting of a step-by-step guide that walks you through connecting the kit to your existing setup. After completion, it's vital to test the sink for any leaks to ensure everything is functioning properly. Regular maintenance tips are also provided to help you keep your stretching kit in optimal condition, ensuring it remains effective for years to come.

Sophia

Sophia

Sophia is a dedicated marketing professional with an exceptional depth of knowledge about her company's products and services. With a keen understanding of market trends and customer needs, she crafts insightful blog posts that not only inform but also engage readers, enriching the company’s online......